Working with Docker
Every developer has a workflow: how their environment is configured and how they access tools and resources. Personally, I have come to prefer lightweight tools and minimal setup.
I thought as I started working with Docker I would need to setup either a separate Linux box and remote into it or install a full-size VM which would steal RAM and disk space and reserve CPU cores. Since I’ve always worked mostly on a laptop I was concerned about how I would have enough hardware to run everything I needed without always having to free up disk space and memory.
Now that I’ve been using it I realize how unfounded my fears were. Even though changing to a bare metal Linux install would mean I could get rid of VirtualBox and docker-machine I find once I get started they disappear into the background. I still have to use VirtualBox but the default Docker VM is only using 1GB of memory and a single CPU. Because of this change of perspective I thought it would be nice to share my workflow. It may help someone else and I may get some tips to improve my own.
I am assuming at this point you have already installed Docker by following their quickstart.
The Tools
We’re going to use only two command-line utilities here in this walk-through:
- docker: This is the docker client. This is your main tool and what you will use for all things that relate to using and creating Docker images and containers.
- docker-machine: This is for managing the host machines where the Docker daemon is running.
Just running either utility from the command line with no arguments will give you a list of commands and idea what each tool is for. I suggest you take a minute and just read through the output for each of the two and then come back here - I’ll wait.
Loading the Docker Environment
When you fire up a fresh bash shell on Windows or OSX before you can start using commands to the docker interface you need to connect it do the docker daemon. Otherwise you’ll get the following error:
Cannot connect to the Docker daemon. Is the docker daemon running on this host?
As long as you’ve installed everything this means you forgot to initialize your session. You can check by running:
$ docker-machine ls
NAME      ACTIVE   URL          STATE     URL                         SWARM   DOCKER    ERRORS
default   -        virtualbox   Running   tcp://192.168.99.100:2376           v1.10.0
If you notice the - under ACTIVE that means your terminal/console environment isn’t configured to connect to the docker daemon. If you’re running in terminal on OSX or Git Bash you can fix this by running:
$ eval "$(docker-machine env default)"
Assuming the default installation then you probably have a machine named default (the value under NAME when you run docker-machine ls). Otherwise for the instructions that follow replace default with the name of whatever machine you may have setup in VirtualBox.
If you’re using Windows I recommend using Git Bash which is installed along with Docker. Not only is it useful for things like SSH in Windows but as you follow Docker tutorials there will be fewer differences than using Powershell or Command Prompt. For example, I find the default color scheme unreadable when I need to list the contents of a directory in my Docker host (more on that later). I could change it but since I prefer Git Bash I haven’t bothered. Also, eval won’t work. You’ll need to run the following command from either command line:
> docker-machine env default
And the result will tell you the command you need to run. Here’s what that ends up looking like
Powershell
> docker-machine env default
$Env:DOCKER_TLS_VERIFY = "1"
$Env:DOCKER_HOST = "tcp://192.168.99.100:2376"
$Env:DOCKER_CERT_PATH = "C:\Users\[USER_NAME]\.docker\machine\machines\default"
$Env:DOCKER_MACHINE_NAME = "default"
# Run this command to configure your shell:
# & "C:\Program Files\Docker Toolbox\docker-machine.exe" env default | Invoke-Expression
Based on that output you would run:
> docker-machine env default | Invoke-Expression
Windows Command Prompt
> docker-machine env default
SET DOCKER_TLS_VERIFY=1
SET DOCKER_HOST=tcp://192.168.99.100:2376
SET DOCKER_CERT_PATH=C:\Users\[USER_NAME]\.docker\machine\machines\default
SET DOCKER_MACHINE_NAME=default
REM Run this command to configure your shell:
REM     FOR /f "tokens=*" %i IN ('docker-machine env default') DO %i
And here you would run:
FOR /f "tokens=*" %i IN ('docker-machine env default') DO %i
Once you’ve done that you can run docker-machine ls again and you should now see the following:
NAME      ACTIVE   URL          STATE     URL                         SWARM   DOCKER    ERRORS
default   *        virtualbox   Running   tcp://192.168.99.100:2376           v1.10.0
Or you can run docker-machine active and it will simply print either the name of the active machine or No active host found.
Notice that you should now see * under ACTIVE. Now you’re connected and should be able to run commands against the docker daemon. The good news is that all docker clients should use the same commands with a couple caveats that I’ll point out as we go along.
Which Context?
I’m not sure if “context” is the right term here, but I’m hoping it conveys my meaning.
When your native environment is Windows or OSX you have a different context than if it’s Linux. Where it bit me first was my first experience with volumes. When you are trying to map files between your host environment and a container’s environment the tutorials I’ve seen always seem to be assuming how it will work in your production environment - which is running in a native Linux environment. But this trips up the uninitiated.
In Windows the C:\Users directory for your host file system is mounted into the Docker VM at /c/Users. In OSX the /Users path is mounted at /Users making the translation easy. You can confirm this in the VirtualBox Shared Folder settings for your virtual machine. In each case it requires you to be aware of something different.
- Windows: you have to translate paths from
C:\Users\to ’/c/Users/’ (lowercasec). - OXS: No translation of paths, but if you want to share files outside of
/Users/you need to share them using VirtualBox, ensure they’re mounted and use the path as the Docker VM sees it.
When you’re working with your application files this is just something you need to understand and work with. You need to just remember that Docker is running inside a Linux VM, so it can’t see your Windows or OSX file system. This can trip you up sometimes, but what find helps a lot is to work in the context of the Docker host (the VM). Here’s how you do it:
    $ docker-machine ssh default
                        ##         .
                      ## ## ##        ==
                   ## ## ## ## ##    ===
               /"""""""""""""""""_/ ===
          ~~~ {~~ ~~~~ ~~~ ~~~~ ~~~ ~ /  ===- ~~~
               ____ o           /
                 \    \         __/
                  ____/
     _                 _   _     _            _
    | |__   ___   ___ | ||__ \ | | ___   __| | __ _ __
    | '_ \ / _ \ / _ | | _) / _` |/ _ \ / _| |/ / _ \ '|
    | |) | () | () | | / / (| | () | (|   <  / |
    |_./ _/ _/ _|__,_|_/ _|_|__|_|
    Boot2Docker version 1.10.0, build master : b09ed60 - Thu Feb  4 20:16:08 UTC 2016
    Docker version 1.10.0, build 590d5108
Now except for the files hosted in your native environment it’s really not different than if you were running natively on Linux.
Running Containers
This is pretty well documented, but this wouldn’t be a proper walk-through unless we started up a container and pointed out a few things.
First, lets just fire up a container:
$ docker run -d -P nginx
The -d runs the container in the background - which is what you want most of the time. If you leave it off the output of the docker logs command will tail to your console. That’s not what we want at the moment so we’ll leave it at that.
Once it’s done the output to your console will look something like this:
Unable to find image 'nginx:latest' locally
latest: Pulling from library/nginx
5c9a73b9c4ad: Pull complete
152440d1ba68: Pull complete
cd0794b5fd94: Pull complete
18de280c0e54: Pull complete
bf58831fd41c: Pull complete
ae8e1e9c54b3: Pull complete
Digest: sha256:83be29bb91fc47f3a7453fc51db66816c9c637131f302a83dfd136e4b1901fbe
Status: Downloaded newer image for nginx:latest
468a6404cfcc1240750866608b51cd41a8465315767605634b272f0eddca1b2d
That last long string of numbers is the container’s hash, or id. But don’t worry, you don’t ever need to type out the whole thing - just enough of the numbers to uniquely identify it. Which means if there’s only one container running, or none of the other containers start with the same character, then you can identify it by a single character like this:
$ docker logs 4
Where 4 is the first character of the container id.
But there are other, more friendly ways to reference a container. For example:
$ docker ps
CONTAINER ID        IMAGE               COMMAND                  CREATED             STATUS              PORTS                                           NAMES
468a6404cfcc        nginx               "nginx -g 'daemon off"   48 seconds ago      Up 47 seconds       0.0.0.0:32769->80/tcp, 0.0.0.0:32768->443/tcp   berserk_kalam
See that shortened CONTAINER ID? You can look it up anytime you need to like we just did. But there’s some other interesting information here as well. Under name can you see berserk_kalam? Yours will most likely be something else. That’s the random name assigned to every container unless you specify the --name option. So you can follow along it will be easier if we can use the exact same commands. So you can run this:
$ docker run -d -P --name www nginx
$ docker ps
CONTAINER ID        IMAGE               COMMAND                  CREATED             STATUS              PORTS                                           NAMES
7ecb60689494        nginx               "nginx -g 'daemon off"   4 seconds ago       Up 3 seconds        0.0.0.0:32771->80/tcp, 0.0.0.0:32770->443/tcp   www
468a6404cfcc        nginx               "nginx -g 'daemon off"   20 minutes ago      Up 20 minutes       0.0.0.0:32769->80/tcp, 0.0.0.0:32768->443/tcp   berserk_kalam
You’ll see a second container and under the name you’ll see www.
You may have also noticed under PORTS that a couple of high ports are pointing to ports 80 and 443. Well those high ports are the ports that your Docker host is listening on, then those ports are mapped to 80 and 443 which are exposed by the container. So if we want to actually talk to our container we need to use the high ports. But at which IP? If you open your web browser right now and put in http://localhost:32771 you’ll see this:

What we need is the IP of the Docker VM running in VirtualBox. So we want to run this:
$ docker-machine ip default
192.168.99.100
Which returns the IP we want. Now if we put that IP into our browser like before at http://192.168.99.100:32771 we should see this:

Those port mappings we’re using were assigned randomly by Docker because we used the -P option. If we had omitted it, we couldn’t access our nginx at all. But what if we wanted to use a specific port? We could use 80, or any other port. But since this is the only web service running on our container we’ll go ahead and use 80. There is a way to change the port of a running container, but it’s easier to just create a new one:
$ docker stop www
$ docker rm -v www
$ docker run -d -p 80:80 -p 443:443 --name www nginx
You should now be able to access nginx from your web browser using the default port 80:

Shared Folders
Update 3/05/16: I’ve written an addition post that reviews shared folders and shows you how to make them permanent.
I mentioned before that by default the OSX /Users directory and the Windows C:\Users directory are mapped by default so your default means of synchronizing files between your Host OS and your VM is to use some subdirectory under the appropriate path. However, not everybody uses those path hierarchies for their development files. As a long-time Windows developer I always needed to conserve every possible path character to stay below the dreaded 256 character limit for paths accessed by msbuild. So I developed a habit of putting all my source code under C:\dev\src instead of C:\Documents and Settings\[USER_NAME] or even C:\Users\[USER_NAME] was too much. Now that my primary system is OSX it matters less but here’s how to map shared folders:
- Open your ‘Shared Folders’ settings in VirtualBox for your Docker VM: 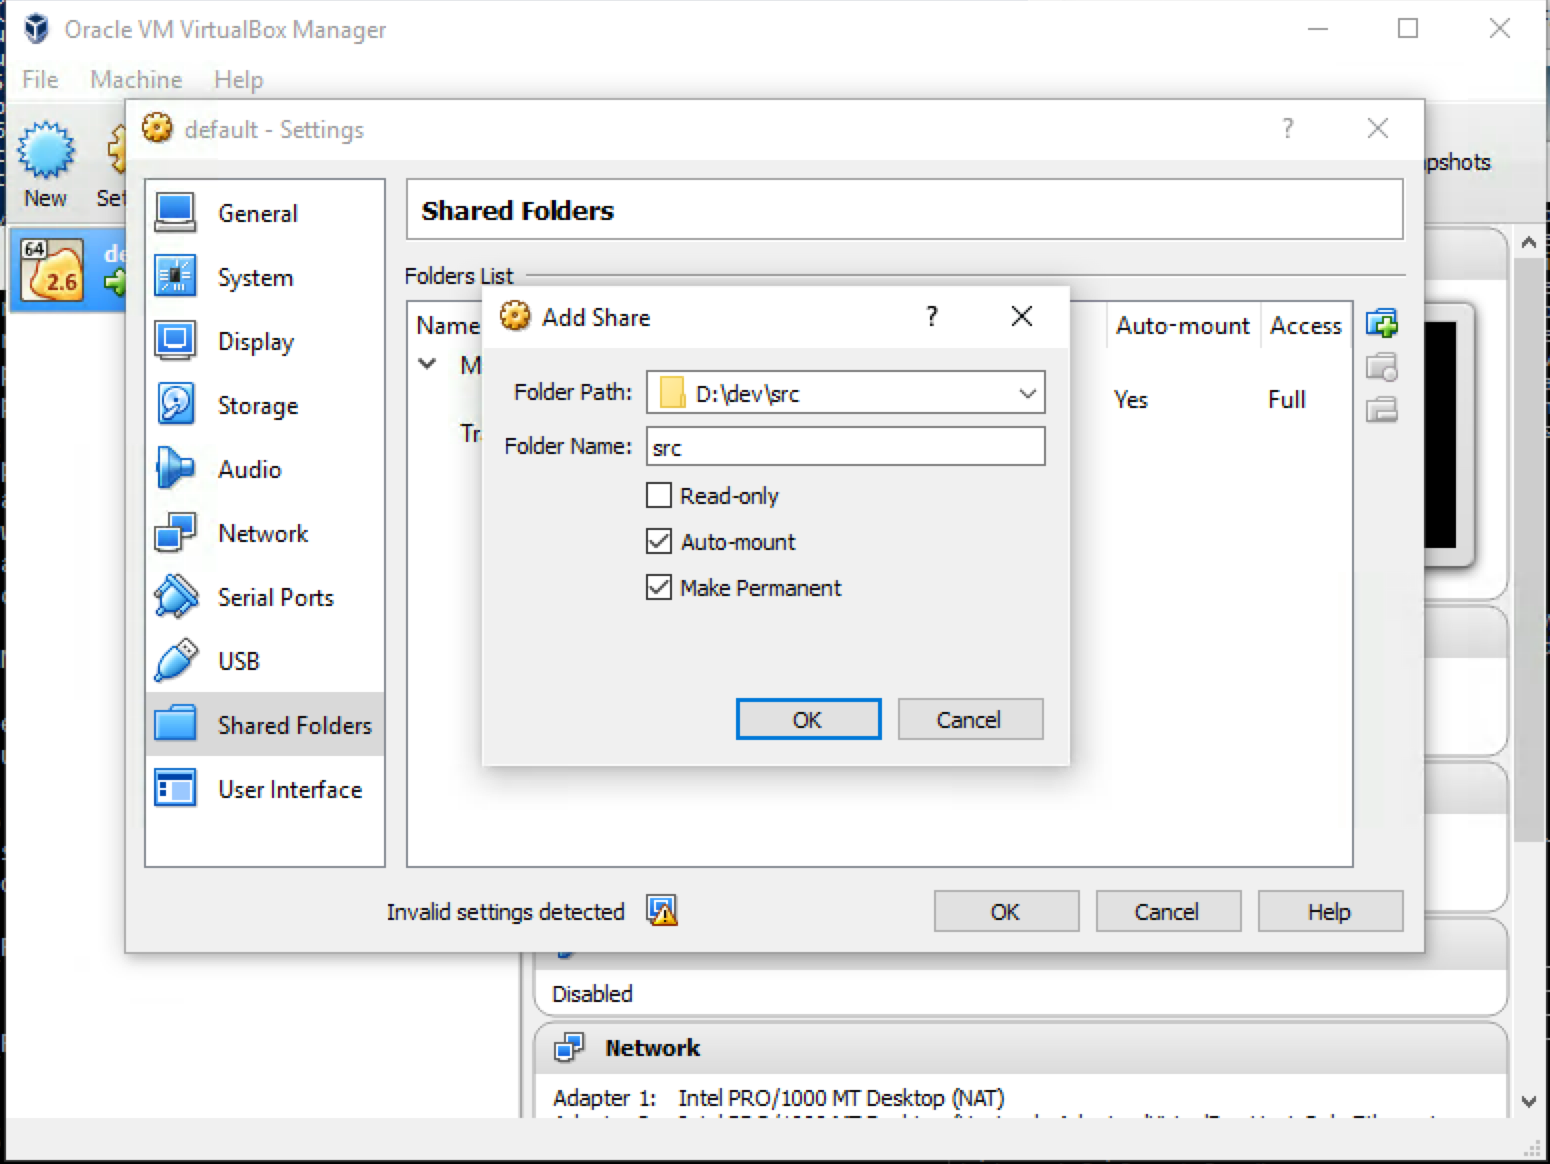
-
Select the path that you would like to share with your Docker VM and accept the default name or change it as you see I’ve done above.
-
Next you’ll want to
sshinto your Docker VM like I mentioned earlier:$ docker-machine ssh default -
Now you want to create a mount point for your shared folder:
$ sudo mkdir /mnt/src
I named minesrcjust like I did in the VirtualBox Shared Folder settings, but the names don’t have to match here, just in the next step. I placed it in themntdirectory which is a convention to follow but you could put it at the root of the file system/if you like - just don’t clash with any other directory names. -
Now we mount the folder using the name from the Shared Folder settings and then the mount point we just created with the
mkdircommand:$ mount -t vboxsf -o uid=1000,gid=50 src /mnt/src
The firstsrcis the name I used in the VirtualBox Shared Folder settings and the/mnt/srcis the directory I created withmkdirfor the mount point. -
You should now be able to verify that your share is mounted by viewing the contents of the mount like this:
$ ls /mnt/src
dvMENTALmadness/ scratchpad/
Which shows the two folders I have underneath my shared folder. When you edit files in either the Host OS or the Docker VM the file will stay in sync - just be aware that Windows and Linux use different line endings so if you edit Windows files inside your Docker VM you may get some issues with line endings.
You’ll also want to make sure that the permissions on your Host OS allow the VirtualBox VM to access the directory. For example, in OSX if you want to create a directory at your file system root called
my-devyou’d have to do this:$ sudo mkdir /my-dev
In order to grant write access from within your Docker VM you’d have to run the following two commands from your OSX terminal:$ sudo chown [your-user-name] /my-dev $ sudo chown :staff /my-def
Which would make the directory permissions match those in your/Users/[your-user-name]
Package Manager
I love package managers. They make setting up software clean and repeatable. So when I started using Docker I started trying to install tools in my Docker VM and then opening up a bash shell into my containers as well and trying to install tools there as well. But it was supremely frustrating because even though I can easily use a package manager (usually apt-get) inside any Dockerfile to install tools for my container it isn’t available from inside my running host or container! Instead the only package manager is tce-load and I found I couldn’t just translate my apt-get knowledge directly to use it - plus not all the packages are even there!
I wondered if I could use a different ISO image for VirtualBox? (Yes, you can). But before I got around to it I came to a realization: You don’t want to use the package manager inside containers. You either need a new image with the tools already installed, or you need a separate, linked container with the tools installed instead of muddying your container. Docker is about microservices - Don’t create monolithic containers
So I don’t use the package manager. Docker provides tools like --volumes-from and --link (still available, but deprecated) and network settings to allow containers to interact with each other in defined ways - including adhoc administration and troubleshooting.
For example, if your container doesn’t have a text editer like vi installed, don’t install it in your container! You should have a separate image with vi installed, when you need to edit files in your container, run the image with vi and use the --volumes-from option to link the files in the two containers. Then you can use docker exec to access the container with vi installed and edit the files. NOTE: I’m not really advocating the direct editing of files in production (I would NEVER do that! :P ), this is just a simple and easy to understand example.
I’ll write a post later demonstrating these principles. This one is already long enough, but I had to make the point.
Getting Inside a Container
Even taking into account the previous section, you often need to get into a container to see what’s going on in there. When I first started everything I googled seemed to point to NSENTER. So I started by using that and completely missed docker exec, which is the now recommended way to access a container.
If I wanted to open up a bash shell directly inside a running container I would do it like this:
$ docker exec -it [container_name_or_id] bash
Where container_name_or_id would be either the name of the container (usually the --name option in the run command) or the unique portion of the container’s hash id.
So if I were running a container for my postgres database that was created from the following command:
docker run --name pg-scratchpad -e POSTGRES_PASSWORD=$DB_PG_PWD -p 5432:5432 -v /var/lib/postgresql/data -d postgres
NOTE: For an explaination of the use of $DB_PG_PWD see: There’s a password in my repository.
Then I could open a command prompt inside the container like this:
$ docker exec -it pg-scratchpad bash
Or to briefly demonstrate using a linked container, you could open up the psql command-line client like this:
docker run -it --link pg-scratchpad:postgres --rm postgres sh -c 'exec psql -h "$POSTGRES_PORT_5432_TCP_ADDR" -p "$POSTGRES_PORT_5432_TCP_PORT" -U postgres'
Which will create a second container, and open a shell prompt for you which is already connected to your postgres database in the pg-scratchpad container!
Persistent Data
If I don’t tell you, you may find one day that after you restart your container (or your whole computer) that your data is gone! Well that’s because by default data doesn’t survive restarting the container. I’ll try to be quick here and save the details for later, but there are a couple solutions:
Between restarts
Volumes provide the solution to persistence. At least that’s part of what they do. You just saw an example of it when we created our postgres container above.
docker run --name pg-scratchpad -e POSTGRES_PASSWORD=$DB_PG_PWD -p 5432:5432 -v /var/lib/postgresql/data -d postgres
See that -v /var/lib/postgresql/data? That tells Docker to create a persistent volume for that container. If you create data in your database, then restart your container, that data will still be there. Without -v your data will disappear!
Between re-deploys
Except that once that container is removed nothing else can reference that data volume and it’s gone! But there’s a solution: Data Volume Containers. They work under the principle that as long as a container is referencing a volume it can still be accessed. Another interesting tidbit is that a container doesn’t have to be running for another container to use it’s volumes!
So we can create a data volume container like this:
$ docker create -v /var/lib/postgresql/data --name pg-data postgres
Then we can use it like this:
$ docker run -d --volumes-from pg-data --name pg-db -e POSTGRES_PASSWORD=$DB_PG_PWD -p 5432:5432 postgres
If we connect like this:
$ docker run -it --link pg-db:postgres --rm postgres sh -c 'exec psql -h "$POSTGRES_PORT_5432_TCP_ADDR" -p "$POSTGRES_PORT_5432_TCP_PORT" -U postgres'
Then we can create some data:
# CREATE TABLE my_table (my_column VARCHAR(64) NOT NULL);
# INSERT INTO my_table (my_column) VALUES ('Docker');
Make sure it’s there:
# SELECT * FROM my_table;
 my_column
-----------
 Docker
(1 row)
Then destroy everything but the data volume container:
# \q
$ docker stop pg-db
$ docker rm -v pg-db
And then create a new container - we’ll call it pg-db-2 just to be explicit this is a new container:
$ docker run -d --volumes-from pg-data --name pg-db-2 -e POSTGRES_PASSWORD=$DB_PG_PWD -p 5432:5432 postgres
And then verify the data is there:
$ docker run -it --link pg-db-2:postgres --rm postgres sh -c 'exec psql -h "$POSTGRES_PORT_5432_TCP_ADDR" -p "$POSTGRES_PORT_5432_TCP_PORT" -U postgres'

# SELECT * FROM my_table;
 my_column
-----------
 Docker
(1 row)
Conclusion
I’m sure you never thought we’d get here. There’s much more to Docker - we didn’t even create our own custom container. But that should be enough to get you started on solid footing if you understand everything we just covered. For a broader coverage of Docker checkout this Docker cheat sheet on Github.