git: Collaborate Using Pull Requests
Following is my take on the Integration-Manager Workflow:
I hope to help others better understand how to implement collaborative workflows with git and github and improve my own understanding. Let’s dive in:
Creating A Pull Request
We’ll start with the steps to create a pull request, then we’ll show you how to review and merge a pull request.
Update: 4/12/16
Originally this post described a setup where the developer public fork was setup under the remote alias origin. A few team members had a little trouble with this setup and so I’ve reworked this post so that blessed repository is aliased as origin instead. In the end I believe this is a little more intuitive so I have updated this post to reflect this new setup. Feel free to message me on twitter if you would like to discuss it.
Forking
Create a fork from the developmentalmadness/Comb repository:

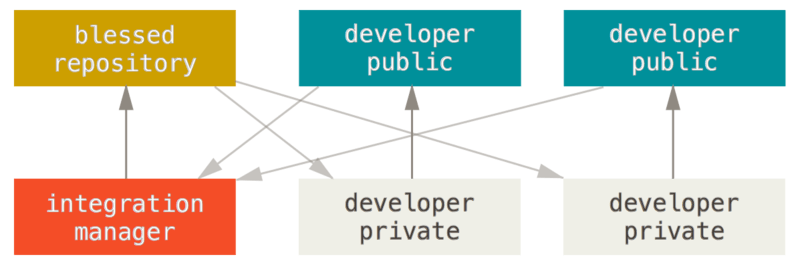
For the purposes of this exercise, the developmentalmadness/Comb repository is the ‘blessed repository’ shown in the workflow diagram at the beginning of this post.
You can find the button to fork the repository right under your profile picture on Github. Just click the 'Fork’ button and you’ve got your own copy of the repository. Your copy of the repository corresponds to the 'developer public’ box in the workflow diagram. 'Public’ in this case only means it is reachable by others - compared to a local copy which we’ll refer to as 'private’ because only you can reach it. The actual visibility of your fork on github will match the repository you forked from.
Cloning
Next we’ll also clone the blessed repository locally. To clone the blessed repository locally first copy the SSH url by clicking the icon that sits above the list of files on the repository page and looks like a clipboard:

Then enter the following command:
$ git clone git@github.com:developmentalmadness/Comb.git
The git@github.com portion of the url tells git to connect using the SSH protocol. The portion after the : is the path to your blessed repository. It will be specific to the owner and will have either a user or organization name before the name of the repository.
Once your run the clone command from your shell you should see something like this:
Cloning into 'Comb'...
remote: Counting objects: 14, done.
remote: Total 14 (delta 0), reused 0 (delta 0), pack-reused 14
Receiving objects: 100% (14/14), 4.50 KiB | 0 bytes/s, done.
Resolving deltas: 100% (1/1), done.
Checking connectivity... done.
Change directories into your newly cloned private fork:
$ cd Comb
Branching
Unless you’re working on a very small project you probably won’t be working off the master branch. But if you just cloned the blessed repository for the first time and check your local branches:
$ git branch
You’ll see you only have the master branch locally. Your result should look like this:
* master
If you want to base your changes on another branch, which could be named integration you’ll want to checkout that branch by name:
$ git checkout integration
You should see the following result:
Branch integration set up to track remote branch integration from origin.
Switched to a new branch 'integration'
Now if you list your branches:
$ git branch
You should see:
* integration
  master
Remotes
Next, add your public fork as a remote - this will allow you to rebase your local branch from the blessed repository, then push that branch to your public fork so you can create a pull request. It will make reviewing your changes easier for the owner thus more likely to be accepted and your history will be cleaner as well.
$ git remote add public git@github.com:inContact/Comb.git
Here public is an arbitrary name chosen to match the naming in the workflow diagram and is just a short name you will use to refer to your public fork in future commands instead of using the remote url.
You should be able to check your remotes setup like this:
$ git remote -v
Which should display:
origin  git@github.com:developmentalmadness/Comb.git (fetch)
public  git@github.com:inContact/Comb.git (fetch)
public  git@github.com:inContact/Comb.git (push)
Usually, the result should look like the output above since you probably don’t have push rights to the blessed repository. origin is simply the default name given by git when you create a new clone and it automatically creates a remote for you.
- NOTE: the steps of cloning and adding a remote can be inverted - it doesn’t really matter which you clone from and which you add as a remote, the result will be the same.
Optional: If it’s been a while since you last cloned or updated from the blessed repository - pull them now. The fewer changes you need to integrate the easier your rebase will be.
$ git pull origin integration
This will get any changes you may be missing from the blessed repository so your local clone will have all the latest changes.
Topic Branch
Now that our private fork is in sync with the blessed repository, create a topic branch off the branch you intend to merge into:
$ git checkout -b my_pr integration
Switched to a new branch 'my_pr'
This will create a new branch -b named my_pr (pr is short for pull request) based on the branch named integration and check out that branch. If you want to see which branch you on currently you have two options:
$ git status
On branch my_pr
nothing to commit, working directory clean
Or sometimes easier to read is:
$ git branch
  integration
  master
* my_pr
Where the asterisk * indicates the current branch.
Make your changes to the project files and commit them to your local, source branch. As an example you might do this:
$ touch new_file_to_add.txt
$ touch another_file_to_add.txt
$ git add .
$ git commit -m "added some new files"
Once you’re done your changes need to be integrated. In other VCS tools this would be done using a merge command. Git allows this as well, but a better way is to use rebase. Why? The short answer is it will make reviewing and merging your PR much easier for the person responsible - which is just polite. The benefit to you is your PR is more likely to be accepted. Here’s an explanation of rebase. And in our current demo, here’s how you would rebase your topic branch:
$ git checkout integration
$ git pull origin
$ git checkout my_pr
$ git rebase integration
Squashing (optional)
Update: 4/12/16
As of April 1st (not a prank - really!) Github announced a new feature for pull requests: Squash and Merge. This allows the reviewer to decide if they want the PR squashed or not. You can still squash your commits locally as described below, but there’s even less of a reason to now.
Your work may have involved multiple commits before you were ready to create your PR. Many maintainers prefer a nice commit history and atomic changes that are easy to apply or roll back as a single unit. If your PR has multiple commits then you may be asked to squash your changes.
Let’s make an additional change to our PR:
$ touch another_new_file_to_add.txt
$ git add .
$ git commit -m "added another file to project"
Let’s look at our log:
$ git log

commit a9b165a7a9612d50933414a18b8d28b4abe6a2b0
Author: Mark J. Miller <developmentalmadness@gmail.com>
Date:   Mon Feb 15 17:29:21 2016 -0700

    added another file to project

commit 72208b4e7de0c1b21947d3ab794b41d930e7ac3c
Author: Mark J. Miller <developmentalmadness@gmail.com>
Date:   Mon Feb 15 16:33:22 2016 -0700

    added some new files

commit 3d2dcffe042f376c9f404cf685f4f710eb9d06e9
Author: Mark J. Miller <developmentalmadness@gmail.com>
Date:   Sat Mar 10 13:48:08 2012 -0700

    Updating readme
Here we see the last 3 commits (the last 2 are ours). What we want to do is squash our two changes into a single commit that can be merged without cluttering up the history of the blessed repository.
Start with an interactive -i rebase of the last two HEAD~2 commits:
$ git rebase -i HEAD~2
If you’re working from the command line (bash shell) then this will open up the vi text editor with something that looks like this:
pick 72208b4 added some new files
pick a9b165a added another file to project

# Rebase 3d2dcff..a9b165a onto 3d2dcff (2 command(s))
#
# Commands:
# p, pick = use commit
# r, reword = use commit, but edit the commit message
# e, edit = use commit, but stop for amending
# s, squash = use commit, but meld into previous commit
# f, fixup = like "squash", but discard this commit's log message
# x, exec = run command (the rest of the line) using shell
# d, drop = remove commit
#
# These lines can be re-ordered; they are executed from top to bottom.
#
# If you remove a line here THAT COMMIT WILL BE LOST.
#
# However, if you remove everything, the rebase will be aborted.
#
# Note that empty commits are commented out
In order to combine the two commits into a single commit you want to leave the top (the most recent) commit as pick and change any other commits to squash while leaving the hash and comments in place. The result should look something like this:
pick 72208b4 added some new files
squash a9b165a added another file to project
Once you’ve finished your changes and saved them (esc, then :wq in vi). You’ll get a second edit in vi that will look like this:
# This is a combination of 2 commits.
# The first commit's message is:

added some new files

# This is the 2nd commit message:

added another file to project

# Please enter the commit message for your changes. Lines starting
# with '#' will be ignored, and an empty message aborts the commit.
#
# Date:      Mon Feb 15 16:33:22 2016 -0700
#
# interactive rebase in progress; onto 3d2dcff
# Last commands done (2 commands done):
#    pick 72208b4 added some new files
#    squash a9b165a added another file to project
# No commands remaining.
# You are currently editing a commit while rebasing branch 'my_pr' on '3d2dcff'.
#
# Changes to be committed:
#       new file:   another_file_to_add.txt
#       new file:   another_new_file_to_add.txt
#       new file:   new_file_to_add.txt
#
If you want to leave all the individual commit messages you can just save and quit vi like before. Otherwise edit the uncommented lines to be the message you’d like to commit and then save and quit vi again. For our purposes, just comment out the second commit message 'added another…’ by putting a hash symbol # at the beginning. Save and quit and then you’ll see this result:
[detached HEAD d627ac6] added some new files
 Date: Mon Feb 15 16:33:22 2016 -0700
 3 files changed, 0 insertions(+), 0 deletions(-)
 create mode 100644 another_file_to_add.txt
 create mode 100644 another_new_file_to_add.txt
 create mode 100644 new_file_to_add.txt
Successfully rebased and updated refs/heads/my_pr.
Now that you’re done, if you didn’t do it before rebase your private branch by pulling any new changes from the blessed repository to your private repository, and rebasing your topic branch (same as above):
$ git checkout integration
$ git pull origin
$ git checkout my_pr
$ git rebase integration
The pull request
Push your local branch my_pr up to your public fork - if you’re doing it correctly this should create a new branch in your fork which is a copy of your local source branch:
$ git push my_pr public
Once the push completes navigate to the main page for your fork on github.com. You should be able to see your local branch is now on github by clicking on the “branches” link in the header above the repository’s git url.

Select the tab labeled “All branches” and you should see your my_pr branch:

If it isn’t there sometimes it takes a minute, just wait and refresh.
You can now create your pull request from your my_pr topic branch. Just click “New pull request” for the branch my_pr. You should see this page:

The master branch usually seems to be selected (for me) so make sure the base fork points to the blessed repository and base branch is what your PR was based from - in our case integration, then select the head fork to be your public fork and the branch my_pr to be the source for your PR:

Leave any comments to describe your changes. These will become part of the pull request but not the repository history. Then click “create pull reqeust”. At this point you wait to hear back from the owner, or whoever will be reviewing your changes.
Optional: whoever reviews your PR may have some suggested changes before they accept your PR and merge it to the target repository. If so, then just make the suggested changes, commit, rebase from blessed, squash (rebase -i), and push. The changes will automatically be added to your PR and the reviewer can be notified to repeat the review process.
NOTE: If you’re squashing your commits and adding changes after your first push then when you push after subsequent squashes you’ll need to include the -f option with your push because you are overwriting the history of a remote (public) repository. Anyone who has pulled your my_pr branch (eg. the reviewer) will need to delete the branch and pull again. This shouldn’t be a big problem because no one should be using this branch for any development anyhow.
Accepting A Pull Request
As long as the PR was created following the above workflow then github will most likely tell you that there are no merge conflicts. If this is the case there’s a nice button that allows you to accept the changes and they will be merged into your branch for you. If you have a full suite of tests that will run and you have high confidence in your test suite then this might work for you. However, I’d recommend pulling the changes locally, reviewing them in context, and then building your project, running the tests yourself, running the project and validating the changes are what you wanted. Here’s how you would do that:
Review Branch
Create new branch named review_my_pr from a branch named integration so you can review the changes locally. review_my_pr is just an arbitrary name, but integration should match the name of the base branch from the PR:
$ git checkout -b review_my_pr integration
You now have the review_my_pr branch checked out. Pull the my_pr topic branch from the repository where the PR originated:
$ git pull git://github.com/inContact/Comb.git my_pr
Remotes for frequent contributors
If the developer who submitted the PR is a frequent contributor or team member you may want to add a remote to their public fork so you can use a short name to refer to their public fork instead of the full url:
$ git remote add committer_mark git://github.com/inContact/Comb.git
Now you can use this instead to pull their my_pr branch:
$ git pull committer_mark my_pr
From here review the changes, build, test and run the project to validate if you’ll accept the pull request.
rebase your review branch from the blessed repository the latest for the integration branch to ensure you are up to date:
$ git pull --rebase origin integration
Merge into branch (–no-ff)
$ git checkout integration
$ git merge --no-ff review_my_pr
Push to remote (target)
$ git push origin integration
Github sees the push and automatically marks the PR as merged. The topic branch can now be deleted, although resist the urge and allow the owner of the branch control over their own repository.
Definitions
- Clone: copying an entire repository to your local machine
- Fork: copying an entire repository to a new (personal) repository in Github
- Commit: a changeset within a repository. It’s important not to conflate this with the 'commit’ command which save a change to a local branch. You may need to change your vocabulary and stop referring to the 'push’ operation as 'committing changes’ to a remote repository because it conflates two operations that have different results when working in a distributed source control system.
- Pull: fetching any commits from another repository which don’t exist in your local repository and merging them into the current branch.
- Push: sending any commits from the current branch in your local repository to a remote repository.
- Pull Request (PR): The changes you want to submit to the intended project repository.
- Blessed Repository: The main project repository
- Developer Public Repository: A fork of the blessed repository, where the developer pushes topic branches to submit as PRs.
- Developer Private Repository: A local clone of the developer public repository where changes are made on a topic branch before pushing to the developer public repository.